TL;DR
- Use a python IDE which works well with matplotlib such as Spyder or Jupyter Notebooks.
- The sub-package matplotlib.pylab will be your go-to when creating figures, axes, and lines. Other sub-packages such as .colors and .style are also useful for stylistic purposes.
- For modular code, edit the .rcParams of matplotlib to edit global styles such as fontsize and colors.
- Look at the matplotlib galleries for inspiration and read their tutorials for any specific help. Stack exchange and cheatsheets are aboound on the web.
This repo practice files can be found here:
- line charts
- bar charts
- subplotting
- more to be added …
Table of Contents
Getting Started
Python is a versatile tool for many computational task, be it for image processing, machine learning, or web development. Given its versatility and wide adoption, the need for robust and professional scientific plotting was developed, and was established with a package called Matplotlib in 2003.
To make the adoption and transition of matplotlib smooth from (typically) MATLAB users, the syntax is quite similar. For example:
MATLAB
x = linspace(0, pi, 100)
y = sin(x)
plot(x,y)
Matplotlib
import matplotlib.pylab as plt
import numpy as np
x = np.linspace(0, np.pi, 100)
y = np.sin(x)
plt.plot(x, y)
plt.show()
However, the advantage of python and matplotlib goes basic plotting syntax and utilizes an object-oriented approach for plotting, and easy to use getters and setters to modify nearly all parts of a figure. Please look at the matplotlib galleries for inspiration and read their tutorials for any specific help.
Downloads
Downloading python from the web is not enough, to take advantage of the programming languages additional scientific packages such as numpy, pandas, and matplotlib need to be installed along with it. There are two ways to download python and its core scientific packages. Downloading the python distribution directly and installing the packages yourself with python’s package manager pip. Or downloading a catered scientific python distribution such as Anaconda which comes with the most common packages and many more features beyond python (explained below).
Getting Python >3.0
New python users should focus on Python 3, as the previous version 2 will eventually become outdated, and eventually abandoned. If you are downloading python directly, you will also have to download [pip](https://en.wikipedia.org/wiki/Pip_(package_manager) which is the package manager that helps download and track external packages such as matplotlib. To download Python 3 along with pip please follow these guides:
note: some computers already come with python installed, usually version 2.X. Do not uninstall this distribution of python as it may be fundamental to your computer’s processes. When installing python 3, the installation will rename this new install python3, and pip to pip3. Therefore, when executing commands, use python3 and pip3.
Packages have to be downloaded using pip. Packages can be manually installed using the command line and typing pip3 install <package name>. Alternatively, you can record all the packages you need in a requirements.txt file and tell pip to install from the list using:
pip3 install -r requirements.txt
Getting Anaconda with Python 3
Anaconda is a scientific python distribution which installs python along with many common scientific packages, a new command line interface and command called conda, and a GUI to help visualize your python environments, packages, and launch other useful GUIs such as Spyder and Jupyter. When choosing which anaconda version to install, new users should focus on version 3.
note: if you believe you will use python primarily for scientific code and plotting, then make sure anaconda puts its python distribution in your environment variables.
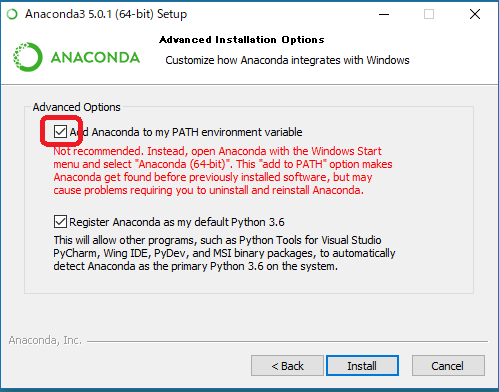
This is not recommended because many advanced users of python will have multiple python distributions, and sometimes other programs install their own python distribution which may conflict with Anaconda’s. However, the benefits for adding Anaconda’s python distribution as your default python makes using the command line and IDE’s such as Spyder and Jupyter easier to manage.
Virtual Environments (advanced topic)
It has already been touched upon that python is installed from distributions (e.g. the python community, or from Anaconda); hence, python is distributable. Also, packages are routinely installed to augment python’s functionalities. This begs the question: how do I make sure I protect the python distribution I want, and manage my packages correctly from conflicting ones? The answer is virtual environments, where you literally install another python distribution in a separate folder or path. Once you activate a virtual environment, you are then “protected” from others and can install packages directly in your dedicated environment. Likewise, if your python environment gets messed up, it can be easily deleted or replaced. You would call these “sandbox” or “playground” environments.
There are two approaches when managing and using virtual envionrments for native python 3 installations and Anaconda.
Python 3
Before making a virtual environment, make sure you know the folder location, and whether this is a convenient location to install some files and folders. Creating a virtual environment will place the python files directly where you are.
Virtual environments are created via the command prompt using the venv package that comes with python 3 (not 2):
python3 -m venv SOME_NAME
Note that your environment name cannot contain spaces, and a new folder with the environment name will be placed in your current directory. Once created, you now need to activate it. Still in the command line type:
SOME_NAME\Scripts\activate.bat #Windows
source SOME_NAME/bin/activate  #Mac/Linux
To confirm the environment activated correctly, your command prompt will have a prefix of your new environment name in parenthesis.
C:\your\path             # not activated
(SOME_NAME) C:\your\path # activated
To deactivate, you can be located in any folder, type on the command line:
deactivate
Anaconda
Anaconda has superseded the python command and instead calls on the conda command to handle environments and other python functions at the command line. To create virtual environments enter:
conda create -n SOME_NAME python=x.x anaconda
To break it down:
create= creates the virtual environment-nor--name= specify the name of the environmentpython=x.x= python version you want to install. Even with Anaconda 3, you can install python 2 versionsanaconda= everything after the main body of the command specify the list of packages you want to install. Typing anaconda will install 20 or so packages automatically, which come with numpy, scipy, matplotlib, etc. and some I have never used before. If you want to be more frugal, you can replace anaconda with other package names.
On downloading packages, pip has also been replaced with conda. To download packages after you made your virtual enviornment enter:
conda install -n SOME_NAME matplotlib
install= installs a packages-nor--name= IMOPRTANT conda is a global command, so it has no idea what environment you’re in. Therefore, to make sure the package gets installed in the right environment you need to manually set the environment name with -n.matplotlib= after the command, list out the packages you want to install
Installing packages from a requirements.txt
conda install -n SOME_NAME --yes --file requirements.txt
--yes= automatically approve all installs in the requirements.txt--file= tells conda that you will install from a file.
note: It is recommended that all packages are installed via conda, as this integrates with the other GUIs and features Anaconda provides (such as visually tracking your environments). However, you can still use the pip command, and even the venv command; however, mix-uses will lead to inconsistencies when tracking your environments and packages. Your code will still work, but your bookkeeping will be off; which defeats the purpose of using virtual environments in the first place.
Differences between Python and Anaconda
As a fun play on words, the Anaconda team chose this name because Anacondas are bigger than pythons. That’s the first difference.
| Python + Pip | Anaconda |
|---|---|
| Comes with no additional support, you need to know what you’re doing | Anaconda aims to remove the overhead and difficulty installing mostly all scientific packages |
Use basic commands such as pip and venv |
Need to learn how to use conda instead |
| If questions arise, most community-based answers may not be directly applicable for your scientific purposes | Mostly all anaconda related questions online focus on common problems and bugs related to scientific computing and management |
Advanced topic: venv will create the virtual environment at your desired location. If you are using multiple computers and a file sharing service (e.g. Dropbox, Drive), your other computer can activate this python distribution as you are sharing the literal file location and contents. |
Advanced topic: conda install will place your virtual environment in a directory specific to your computer. Therefore, your other computers will not have access to it; therefore you cannot activate it and resume coding elsewhere. |
Code Editors
Two of the major scientific python code editors are Spyder and Jupyter Notebooks. If you are coming from a MATLAB background an easy transition is Spyder, if you are relatively new overall and want to begin with a widely popular, yet alternative way, of scientific computing then use Jupyter Notebooks. Here are the differences between the two:
| Spyder | Jupyter |
|---|---|
| A GUI similar to MATLAB | A web-based application (i.e. you need a web-browser like Chrome) |
| Has many preferences and settings that can be adjusted such as panel positions, syntax coloring, text size, etc. | Your interface is limited to the web-browsers and Jupyter’s default settings. You will have to dig in a bit more to change small preferences |
Blocks of code are run in cells using #%% |
Code has to be run in blocks, there are many hotkeys to create, delete, and maneuver between blocks |
| Spyder comes with an iPython kernel which Jupyter uses. In addition, Spyder comes with a debugger, variable viewer, file explorer, etc. | Without add-ons, Jupyter simply is a code-editor. |
| Files are saved as basic .py files, which are easy to share, edit, and version control | Files are saved as _.ipynb, which when shared (e.g. github) render into html; however version control is a bit more round-about |
| Spyder is python only (there is some discussion of having other languages) | Jupyter also runs R, Haskell, Javascript, etc. and can render Markdown in cells making commenting very pretty and versatile |
There is now a new coding editor called Visual Studio Code which Anaconda has recently partnered with. Think of Visual Studio Code as a prettier version of Spyder with more intuitive panels and icons, but without some features such as a variable explorer and an interactive python console.
A deprecated editor, but may be resurrected in the future, is Rodeo. Rodeo mimicked the famously popular R Studio IDE, and it was elegant and intuitive to use. The original company got bought and no longer develops the platform. Even the download site will give an error unless you download the 2nd latest version. However, the code-base still exists for people to hack, and personally, I wish Rodeo was still around.
Takeaway
If you want to have a MATLAB-like environment then Spyder is the way to go. However, those who have been part of the python scientific community from the start will most likely rave about Jupyter notebooks, and its probably more used than Spyder for its sharing and appealing documentation capabilities. If you want something brand new, like exploring, then try Visual Studio Code, as it will only get better. For my academic work, I tend to use Spyder. For assignments or works that should be shared or used as educational resources, then I use Jupyter.
Practice
This repository contains figure making tutorials and example plots typical to the Bioengineering field, specifically those seen and taught at MIT.
The main practice files can be found here:
This repo will be added onto, and we welcome collaboration and contributions from the community to better help future students.